Cara Awal Mengakses Meitu PhotoEditor
28 Okt
1.) Buka website:: http://xiuxiu.meitu.com/ dan http://hzx.meitu.com/
2.) Klik pada link yang berada di paling kiri (di sebelah gambar orang)
3.) Setelah di klik, klik pada link Save File yang keluar setelah kamu menjalani langkah yang nomor 2
4.) Install file yang bernama xiuxiu setelah selesai di download
5.) File akan otomatis tampil di desktop kamu (sebagai link, bila kamu telah berhasil meng-install)
6.) Untuk selanjutnya, silakan kamu pelajari sendiri, ya! Dijamin mudah!
Selamat Mencoba!

Klick yang warnanya kuning
美图秀秀 meitu xiuxiu photo editor
So I happen to only just learn about this free photo editor through Yasmine's blog. She's a DIY queen and has gorgeous photos on her blog. NOW I KNOW WHY! hahaha. Kidding, she's got an eye for photography. ;)
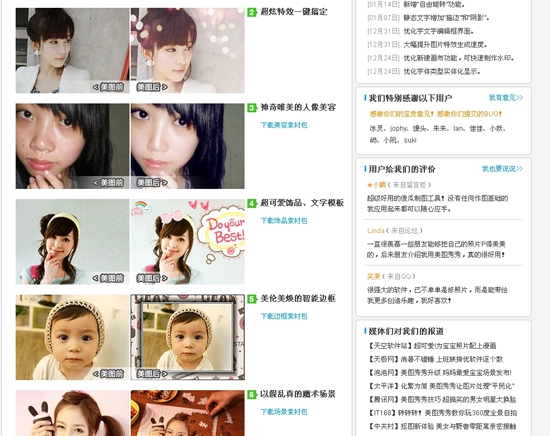
Anyway, 美图秀秀 (meitu xiuxiu) is a Chinese photo editor that's quite versatile and can make your photos really pretty. You can smoothen your skin, add effects, slim your face/body, add cute stickers and so on. Examples taken from the website:
I've been exploring it for a while now and it's pretty fun to use. :) So I thought, oklah...since I have friends who don't know Chinese and might wanna use this program... (not that I'm very good lah...half-past-six only.) I decided to put up a simple step-by-step installation guide so that you won't accidentally install add on softwares. :D Installation guide + mini overview of the photo editor after the jump.
♥How to download and install meitu xiu xiu♥
Step 1: Go to http://xiuxiu.meitu.com/
Click on the yellow box to download the installer.
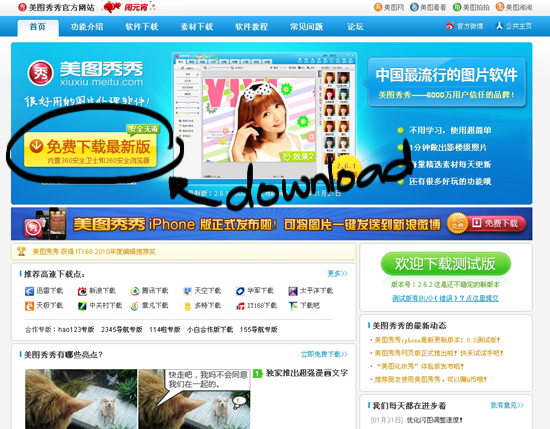
Update: This is what the homepage looks like now:

Don't worry, both the green and orange buttons are download links. The difference is the version of the program. Look under the buttons and you'll see the "release date", so it's up to you whichever version you'd like to download. :) The one in this tutorial is an older version so it might look different. I can't keep up with all the updates they make. Sorry bout that...haha. :p
Step 2: Once downloaded, run the setup.exe file and you'll see the screenshot below. Click the button with a lot of words to proceed to install the program.

Step 3: Choose your preferred directory and then click the middle button to install.

Step 4: Uncheck all of these. If I'm not mistaken, it installs some sorta anti-virus program. Click the center button to proceed.

Step 5: Uncheck the 2nd box. That one makes hao222.com your homepage. Click the center button to finish the installation.

Ta-dah! :)
This is what the program interface looks like. Click on the yellow button to open an image and start editing.

♥Overview/ mini tutorial of meitu xiuxiu♥
To be honest, you can pretty much explore the program on your own without worrying too much about how to use it. :) So I'm just going to explain what some of the important buttons are and how to navigate around. You can click on some of the images for a bigger image.
So once you've click the yellow button that says "打开一张图片", go ahead and select an image you want to edit. If your file is big, you might end up seeing this pop-up message:
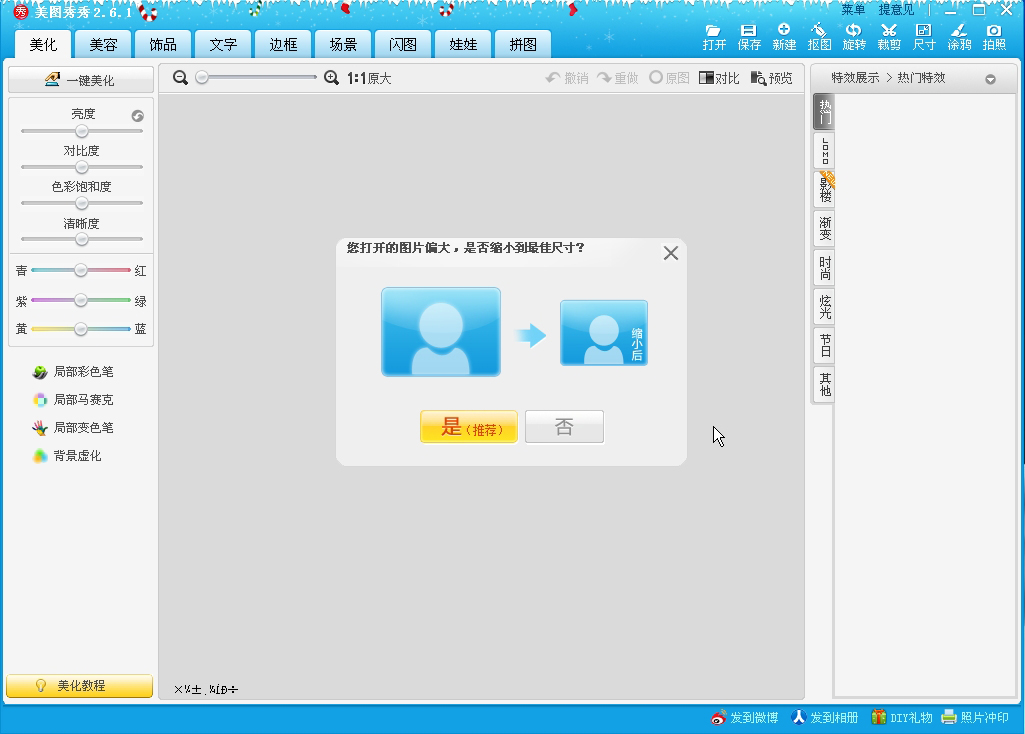
It says your file size is too big and asks if you want to shrink it to an optimum size. Clicking the yellow button means YES (the program will resize your image for you), clicking the grey button means NO. You can choose to resize your image manually later on. I'll show you which button it is later.

So once your photo is opened, this is the layout you'll see. Tabs + menu on top, options on the left and right. By default the first tab is selected. To the right you can see some options to add photo/ lomo effects to your picture. Selecting a lomo effect applies it to your image, you have to "undo" it before you can try another effect.
This is the main menu (top right):

- Open (an image)
- Save
- New canvas (this closes the image you're editing)
- Selection tool (you will have 3 options, swipe to auto select, draw out your selection area, use circle/square/rounded square marquee tools)
- Flip/Rotate
- Crop (you can also make rounded edges to your crop)
- Resize (manually resize your image...there are preset sizes available as well)
- Freehand drawing tool (a brush where you can select colours and draw anywhere on the image)
- Take a picture (using webcam)
Some important things to remember:

(located below the main menu)
Undo and Redo are self explanatory. Clicking "Original Pic" reverts all changes. Compare will show you the before and after. You can choose to save the before and after picture as well. Preview shows you the end result. As some of the stickers and text are animated, you can only see the animation when you click preview. In the preview screen, there's the option to save your work.

(Right side of the interface for the first tab)

(Clockwise from left) Cropped my image, playing around with the colour accent, pixelate and colour swap effects.
A few other important things that you will need to know while editing your photo(s):

This is the most important tab (especially for girls. haha.) You can easily explore the other tabs on your own.
This tab is the beautify tab, other tabs include adding stickers, text, frames etc.
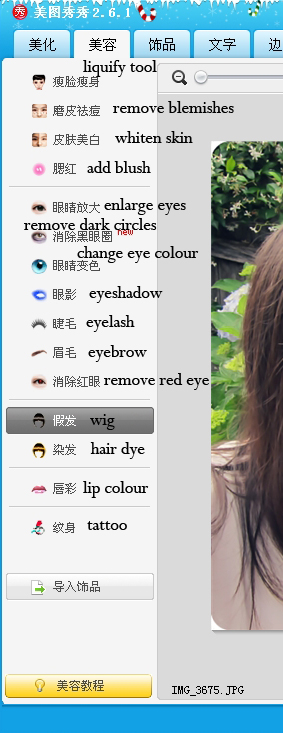
The liquify tool is the same as the one in Photoshop. You can use this to make your face slimmer, body slimmer, boobs bigger etc etc. The remove blemishes tool is the one you can use to smoothen out your skin texture.

Once you're done editing, click the save button in the main menu. You'll see this pop-up with a few options for you to choose.
A - Select this if you want to save your work as a still image (jpg)
B - Select this to save your work as a moving image (gif)
C - Click this to change the directory/folder to save your image
D - Change file name/ file format
E - First button is "Save", second "Save As", third button "Cancel"
Occasionally, you'll also see this pop-up window:

Don't panic! haha. Usually it will appear when you close the program, when you open a new canvas or when you open a new image. So just select "Save" if you have not saved your edited photo, or "Don't Save" and it'll close whatever photo is open. Simple. :)

DONE! ♥
Hope this helps. The rest of the program shouldn't be hard to explore...if there's no "Cancel" button to click, click the top right "X" button. It will usually bring you back to the main editing area. :)
Tuhan Memberkati!


0 comments:
Posting Komentar